


PXE booting is a wonderful and easy way to deploy and install operating systems on a lot of computers at once. PXE turns out to be very handy in educational institutions and enterprises where installing setting up every computer one by one is a difficult task given the sheer number of computers present. Installing a PXE server takes a good amount of time and experience, but today I’m going to tell you about a tool that lets you create a PXE server and boot in a few quick steps. This free tool called AOMEI PXE Boot, freeware developed by AOMEI technology, which gains many compliments for its backup software. AOMEI PXE boot tool has proved to be a pretty easy and handy tool to boot multiple computers from the network, without the complexity of learning and setting up a full-fledged PXE server. It comes really handy in emergency recovery situations where PXE booting is needed temporarily.
Also Check : AOMEI Partition Assistant – Review
How to do?
The working of AOMEI PXE Boot is pretty straightforward: You install the application on the system to be used as a server, mount the ISO, and wait for the client system to boot from the network, and let AOMEI PXE Boot handle the rest. This is essentially a two-part process. The first part involves setting up the client computer for network boot, and the second consists of setting up and running the application on the system acting as a server. Do note that both of them need to be connected to the same network.
Part 1: Setting up The Client Computer for Network Boot
As the title suggests, the first thing that needs to be done is configuring the client computer(s) for booting via the Wired LAN. To do this, you need to access the computer’s BIOS menu (usually, the hotkey is F8 or DEL, and it depends on what computer model you use).
Step 1: Click Bios Features -> CSM Support, choose “LAN PXE Boot Option ROM” with down arrow, and turn its status from “Disabled” to “Enabled”. And then select the PXE option as the first boot device.
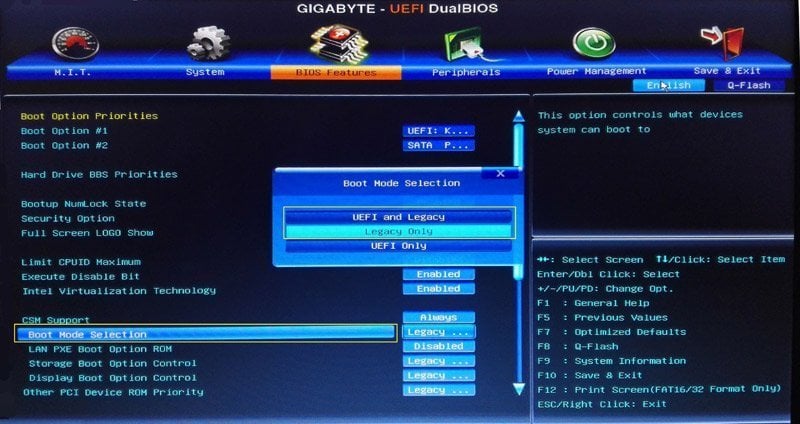
Step 2: Press enter in “Boot Mode Selection”, you should choose “UEFI and Legacy” or “Legacy Only”, Since AOMEI PXE Boot supports only the Legacy boot mode.
Part 2: Downloading the ISO and Running the Application on the Computer Designated As Server
This part’s actually pretty simple. To get started, download and install the lightweight (about 5 MB) AOMEI PXE Boot application on the computer that’s to be used as the server. In addition to that, you also need to download the bootable disk image (ISO file) that’s to be used for booting up the client computer(s).
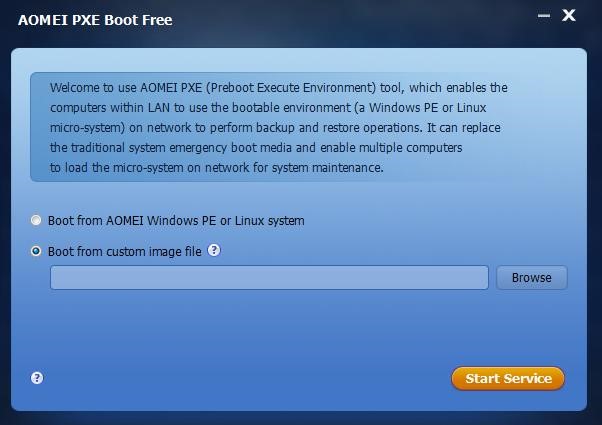
Step 1: Run AOMEI PXE Boot. On the first screen of the program, select the Boot from custom image file option, and browse for the downloaded ISO file. You can also use the other option to download the AOMEI Windows PE or Linux ISO if you want that. Once the same is selected, click on the Start Service button.
Step 2: After clicking “Start Service”, AOMEI PXE Boot Tool will configure related data automatically and start the service to wait for target computers. That’s all that needs to be done on the server computer’s end.
Closing Words
AOMEI PXE Boot is an incredibly capable software application to boot computers with an ISO over Wired LAN. It’s simple, ridiculously easy to set up, and works surprisingly well. If you’re a network administrator looking for a simple, no-nonsense and efficient way of remotely deploying and managing OS’ and application, AOMEI PXE Boot just might be what you need.


Comment here